So, here is the answer.
Many bloggers have already used several sites for contact form building and they have posted in-depth tutorials for this. You will be able to find quite a few of them yourself. Here is my addition.
A contact form is indeed essential for a professional blog. A sign that the blog is professional. There are a number of services, which allow you to paste a customized contact form to your own blog. Here are some of them.
Part I: Free Contact Forms
There are a number of free online contact form builders, which have pretty much built in templates for contact forms. In this first part, we will see some of them.
1. EmailMeForm
This is my choice for professional contact forms. You can do pretty much great customization with this application. Go to emailmeform.com and sign up. You can start a new contact form after signing up and you can add fields to it the way you like.
You can have this form hosted on your Blogger blog itself by publishing the form HTML code provided by them as an individual post or host it in their server itself as I have done. Make sure you disable comments and trackbacks on this post. You can choose a Thank You page and it may be redirected to your blog as I have done here.
You can have this form hosted on your Blogger blog itself by publishing the form HTML code provided by them as an individual post or host it in their server itself as I have done. Make sure you disable comments and trackbacks on this post. You can choose a Thank You page and it may be redirected to your blog as I have done here.
2. Kontactr
Kontactr has been one of the most popular contact form providers for blogs for pretty much some time. I don’t know why, but now the site gives me a 403 forbidden error.
3. Contactify
Just as the others, Contactify helps you build very professional contact forms, which can be added to your blog.
4. MyContactForm.com
MyContactForm.com is another professional contact form builder with quite a number of features including field validation, templates, autoresponders, etc. However, the premium features are available at a payment here.
Part II: Build Your Own Personal Professional Contact Form With ZOHO
ZOHO is a tight competitor for Google Docs and one of the best. Here are the steps to building a contact form using ZOHO Creator.
1. Start New Application
Go to ZOHO Creator and sign in using your Google account. Now, click, Start New Application link, and you will be directed to the page like this:
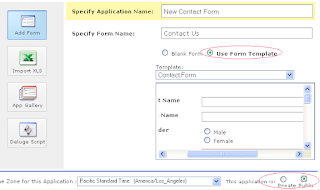
Choose the form name. You can choose form templates, which will give you professional designs. Make sure you make the application public as in the screenshot, for all people to access the form.
2. Add Fields
In the next step, you can add pretty much any sort of fields to the contact form as you wish. Add name, email, subject, message fields, and any other fields as you choose.
If you know scripting, you can have cool effects on these fields.

You can edit the field properties with the edit link available by hovering over the respective field. Check this screenshot:

3. Captcha for Spammers
You may want to enable Captcha (image of numbers and letters) in your form to fight the spammers. There are people who use automated ways to contact you if you have a popular blog. So, to avoid these spams, use a captcha. In order to use Captcha, click Form Properties from More Actions menu. Check the box, Need Verification Code. Also you can set the ‘Thank You’ message here.
4. Email Notification Settings
This is the most important step. You have to set email notification to the form so that every time someone submits it, you get the message to your inbox. From the More Actions menu, click Email Notification.
By default, the window that opens is like this:

In the screenshot, see the marked regions. For the From field, using the Write Expression button, choose the field name for the user’s email address. This way, you can get the email as being sent directly from the user’s email address and you can reply him directly with the reply button.
In the To field, type your own email address (if ZOHO doesn't allow this, use the admin user ID field there). Also, you may want to choose the subject field with the name you have given to the subject field on your form, which is also shown on the Write Expression window (marked). Don’t also forget to check the Include User Submitted Data check box. Otherwise, you will not get the user’s actual communication. In the message box, you can enter anything, which will be sent along with the user communication.
In the To field, type your own email address (if ZOHO doesn't allow this, use the admin user ID field there). Also, you may want to choose the subject field with the name you have given to the subject field on your form, which is also shown on the Write Expression window (marked). Don’t also forget to check the Include User Submitted Data check box. Otherwise, you will not get the user’s actual communication. In the message box, you can enter anything, which will be sent along with the user communication.
You can alternatively set up the email notification using the scripting menu (for advanced users).
5. Set Up the Contact Form on Your Site
Once you are finished with editing the fields, design and email notification settings, you need to make the form available to your readers. Click on the Access This Application link.
Check the appropriate contact form application and click More Actions menu. You can find Embed in Your Website link. Alternatively, you can use the permalink to host the form within ZOHO itself. Give the link to your contact form in your website and enjoy.
Check the appropriate contact form application and click More Actions menu. You can find Embed in Your Website link. Alternatively, you can use the permalink to host the form within ZOHO itself. Give the link to your contact form in your website and enjoy.
If you have any more doubts, please feel free to contact me.


1 Comments:
"How to Add a Contact Form to Your Blog?" is an invaluable guide for bloggers seeking to enhance their website's functionality and improve user engagement. The 7 Best Online Escrow Facilities Of December Should I Use A VPN On My Home The step-by-step instructions provided make it easy to implement a contact form, enabling seamless communication and fostering connections with readers. A must-read tutorial.
ReplyAdmin tidak bertanggung jawab atas semua isi komentar ,Mohon dipahami semua isi komentar dengan bijak